
It is that time of year when we get to wrap ourselves in our fuzziest blanket, pour hot chocolate in our favorite mugs, and enjoy the warmth of our home. Or if you are more on the adventurous side, you are pulling out the boots, mittens, and your warmest winter coat to go explore the frost-covered world.
Granted not all of the world is experiencing these frigid temperatures and thick blankets of snow; however, if you are, this is also a beautiful time for photography. Maybe not a beautiful time for long icy commutes to work or shoveling a driveway, but definitely a beautiful time for photography, nonetheless.
Winter photography can be beautiful, but it can also be quite challenging. Without the right camera settings, snow may look blue or falling snowflakes may look like white streaks.
Let’s review the secret to getting great winter pictures so you can capture the beauty and nostalgia of the season.
Camera Setting for White Snow
You look outside and see a seemingly perfect photography backdrop- a beautiful blanket of bright white snow. BUT when you take the picture it looks like a sad grey world on your camera. Nothing will dull you winter pictures faster than snow that looks blue or even yellowish (ew!). If you don’t use the proper settings, your camera will most likely gray out the snow. These camera settings will ensure your snow is crisp and white.
Exposure
For bright white snow, it is best to OVERexpose your pictures. The reason behind this is that your camera ‘wants’ things to be gray. By slighting overexposing your pictures, you are pulling more light in and balancing out the gray.
To do this, make sure you are looking at your meter and it is a few notches up or positive.
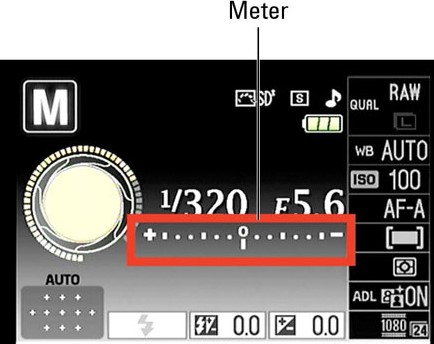
If metering is new to you, check out my post on metering and manual mode!
White Balance
An easy way to think of white balance is that it is the “color” of the light. If you think of a bright fluorescent light, you will notice that it is slightly yellow or “cool”. On contrast, shade can be a little “warmer” or blue.
Often, using your camera’s auto-white balance is sufficient; however, in snow, your camera can get confused by the amount of white and it will create warm tones in your photograph, which could look like blue snow.
Set your white balance mode to “shade”, and your snow will be crisp and white.
Capturing Snowflakes
I personally love to capture falling snow in my pictures. If you want to capture the snowflakes, you will need to have a fast shutter speed. If your shutter speed is too slow, the snow will appear as white streaks in your picture. Although this can be beautiful, if you are going for a falling snow look, you will be disappointed.
With a fast shutter speed, you can capture even the fastest moving snow particles.
Additionally, the fast shutter speed allows you to capture some great action shots. In the picture below, I set my shutter speed to 1/500s (fast). I had my daughter blow into snow and I was able to capture the snow.
Winter Portrait Ideas
It is a blast to photograph snow falling, kids sledding, and snow ball fights; however, capturing those warm moments afterwards is just as special.
Using Snow as a Reflector
The light bouncing off snow is the perfect, natural reflector for your pictures. It creates beautiful catch lights perfect for close-up portraits of your rosy-cheeked subjects.
Capture the Warmth
The cozy indoor cuddles are important to photograph!
The warm blanket cuddles:

The nostalgic hot chocolate moments:
And the rosy red cheeks by a bright window:

Camera Gear and Protection
Make sure you are taking the proper precautions to keep your precious camera safe in the snow! First, just be aware that your camera battery will run out faster in cool weather.
Grab a UV or clear filter to protect your lens from moisture:
Or a polarizer, which can help minimize or remove the glare that can be caused from snow and ice:

Lastly, be sure you slowly acclimate your camera to warmer temperatures after being outside. If your camera warms up too quickly it could cause condensation to build up in your camera.
Summary
So remember, don’t eat the yellow snow….[Ha, gotcha!]
For cool winter photographs:
- Increase your shutter speed
- Over-expose your images
- Set your white balance to “shade”
And enjoy the beautiful picture-perfect scenery around you!
Join our community for access to my free Snow Photography Printable Guide – and all of my other freebies!

I hope this made snapping a little more simple for you! If you found this helpful, share it!
Tom @ {Tech} for Travel
Tuesday 12th of February 2019
Great photos, and very useful tips!
Elizabeth O
Tuesday 12th of February 2019
Beautiful Photos. I iked the way you took the pictures and thanks for all the steps and tips you shared.
Crinkle Hub
Tuesday 12th of February 2019
Great photos and great tips!
JK Darling
Monday 11th of February 2019
I love the way the pics have come out. Though I love photos, I love to be the poser rather than the photographer because I lack the skills.
TheKitchenDoc
Monday 11th of February 2019
Thanks for sharing your tips. Your pictures look great!