
Do you feel like your camera has SO much capabilities, but you just can’t crack it’s code?
Do you look at the back of your camera and wonder why Rosetta Stone doesn’t have a translation edition for your camera settings? Since roughly 65% of us are visual learners, it is no surprise it is difficult to learn photography on your own. You can read hundreds of articles, but the big words never seem to make any sense in your head.
As a visual learner myself, it took me years of researching articles and trying to practice on my camera before it started to click. Now that I understand these settings, I want to make it easier on you.
In this post, we will review:
- What in the world are the MAIN camera settings?
- What the heck are your camera modes (that crazy looking dial)?
- What is all of those other crazy settings on my camera?
What in the world are the main settings?
The three main camera settings you must learn first are shutter speed, aperture, and ISO. These are the camera settings that let in light and determine what your picture will look like.
This quick video gives a super easy-to-follow explanation of shutter speed and aperture. Take a moment to watch it first.
Shutter speed is the setting that controls how long your camera shutter is open. The larger the number is under the 1, the faster the shutter speed. Think of it this way- 1/500ths of a seconds is much faster than 1/5ths of a second.

Aperture is like your eye’s pupil. In low light it dilates to let in more light, and in bright light it will constrict. Aperture controls how much light gets into the camera AND how blurry the background is. It is measured by the “f stop”. The higher the number, the more ‘constricted’ the camera opening is (less light will get in).

ISO is the third important setting to master. ISO controls brightness and clarity. The lower ISO numbers are ideal. They will create the clearest pictures, however in low light you may need to increase the ISO. Keep in mind that a higher ISO will have more “noise” or grain in your image.

Do you want to dive deeper into these three main settings? Great! Check them out here (videos and free guides included):
- Shutter Speed Explained for Photography Beginners: The Secret to Clear Photos
- Aperture Explained for Photography Beginners: The Secret to Background Blur
- ISO Explained for the Beginner Photographer: The Secret to Manual Mode
What the heck are your camera modes?
Mastering this dial should be the next step in understanding your camera settings.
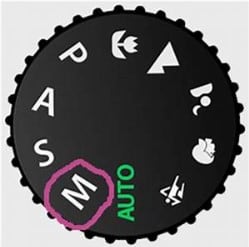
This dial controls your camera modes. Keep in mind that based on your camera, this may look a little different; however, all camera’s have the same basic modes.
- Auto- in this mode, your camera will evaluate the light around you and set the settings that it “thinks” will work.
- M- this is manual mode. In manual mode, you will have full control over all of the settings we will discuss today.
- A or Av- this is aperture priority mode. In this mode, you decide the aperture, or f-stop (which we will discuss below), and the camera will decide on the other settings.
- S or Tv- this is shutter speed priority mode. In this mode, you decide the shutter speed and the camera will decide on the other settings.
- P and other settings- these are all different forms of “auto-mode”.
Aperture priority and shutter speed priority are useful settings, especially when you are learning; however, with manual mode, you will have full control over all of your camera settings. That should be your goal.
What is all of the other stuff on my camera?
Don’t get overwhelmed by the following settings. Once you start to understand the above settings you can start to experiment with these ones, but it is helpful to understand these capabilities.
Have you ever noticed that some pictures look yellowish or blueish? White balance is the the setting that controls the temperature of the light (warm or cold). You can use AUTO mode; however, sometimes you may have to adjust this setting if your pictures have yellow or blue tones to them.

Your Area Focus (AF) mode will determine where your camera will focus. You can have your camera focus on a single point, which is ideal for portraits, or multiple points.

Your release mode will determine what happens when you hold down the your camera trigger. In single release mode, it will take only one picture. In continuous release mode (also known as burst mode) it will continue to take pictures as you hold down the button. This mode is great for action shots!

The focus mode controls how your camera will focus on an object. The continuous mode is great for moving subjects. In this mode, when you hold down your trigger half way to lock in a focal point, even if the subject moves the focal point will follow! On the other hand, in AF-S mode, when you press the trigger half way down, you are locking in the location of the focal point. Therefore, if the subject moves, they will be out of focus.

Watch this quick video, which reviews what we just discussed:
Final Thoughts
Once you understand your camera settings, you will open up a world of photography-capabilities.
Remember, to not get overwhelmed, make sure you understand your three main camera settings and your camera mode dial before jumping into the other settings.
Join our community for access to my free printable guide on camera settings – and all of my freebies!
I hope this made snapping a little more simply for you! If you found this helpful, share it!
If you are ready to up your photography game, consider getting a 50 mm lens! I use my 50 mm lens for 99% of my pictures. It gives great background blur and is fantastic in low light situations! Check it out!

Follow me on Facebook below for more family and photography tips!
boet
Tuesday 15th of August 2023
HI. i like you to send me your tutorials please
Martha
Saturday 3rd of April 2021
These are great tips; thank you! Note, you recommend a 50 mm lens however the link is for a 35mm lens; which should it be?
Paul Pedersen
Friday 3rd of January 2020
"S or Sv- this is shutter speed priority mode. In this mode, you decide the shutter speed and the camera will decide on the other settings."
For your readers who shoot with Canon, it's important to know that Canon has chosen to name this control Tv for Time Value.
Like you, I'm a Nikon user, and Time Value seems like a really funny way to say Shutter Speed.
admin
Friday 3rd of January 2020
Thanks for catching my Typo!! Will update it to Tv!
Modern Moms Club
Wednesday 6th of March 2019
This is a great blog for beginner photographers. I do photography as well and I have been perfecting my manual mode setting for years now.
The Ultimate Beginner Guide to Metering - Simply Snapping Mom
Wednesday 6th of March 2019
[…] a better understanding of your three main camera settings check out my descriptive post for visual learners or my camera setting articles here (video tutorials […]