
It goes by many names: bokeh, background blur, or the magic ingredient to photos (okay, that last one I made up). Bokeh comes from a Japanese word ‘Boke’, and refers to the amount of blur in the out-of-focus parts of your photograph.
Bokeh is simply magical because it gives you the opportunity to create a picture that is literally a snapshot of how you see the world. If you hold your hand up to your face and focus on it, notice that everything else behind your hand is out of focus. The further objects are from your hand, the blurrier they become. The creators of your camera didn’t invent the wheel. Your camera works just like your eye!
With the right tips and tools, you can get the background blur you desire. Follow these three easy tips to achieve bokeh.
1) Subject Placement is Key!
For the creamiest background blur, have your subject closer to you than they are to the object in the background.
You can see in the below depiction, for the best background blur, you would want to be closer to the subject than the subject is to the background.
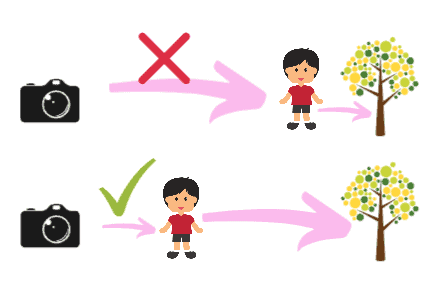
This even works on a smaller scale. In the following two pictures, the camera was very close to the object in view, and the out-of-focus area was further away.
Also, “background” blur doesn’t necessarily have to be in the background. If you focus on a object in the back, a closer image could be out of focus.
2) Lighting and Camera Settings
For optimal background blur, it is key to have a good understanding of your camera settings and how they are affected by light.
For a detailed overview on your camera settings (including FREE video tutorials), check out the following articles:
- Shutter Speed Explained for Photography Beginners: The Secret to Clear Photos
- Aperture Explained for Photography Beginners: The Secret to Background Blur
- ISO Explained for the Beginner Photographer: The Secret to Manual Mode
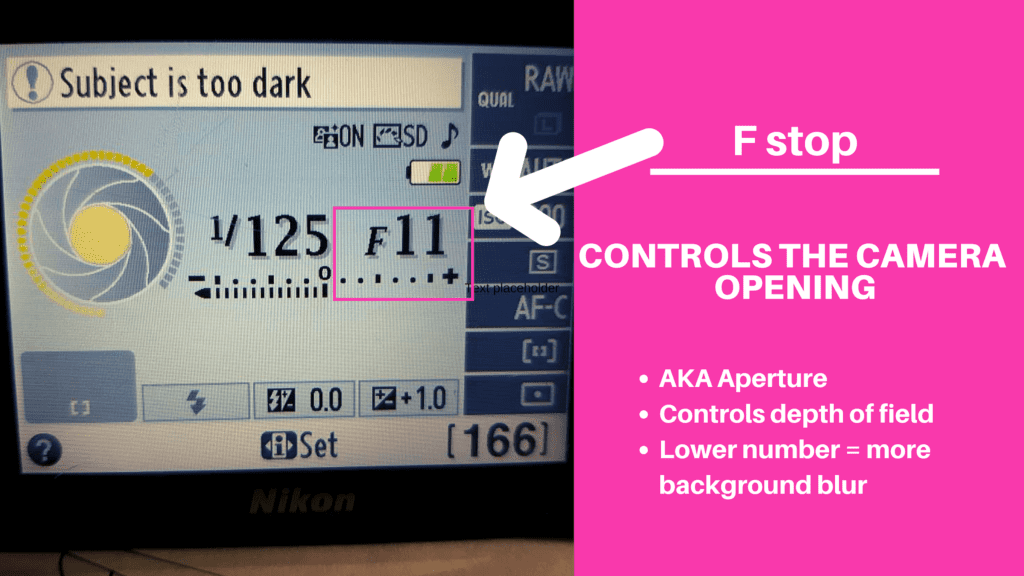
The camera setting that has the most impact on background blur is your f stop, or aperture, setting. This setting controls the opening of your camera. Think of this setting as your camera’s PUPIL. When it is very bright, the pupil will CONSTRICT to let in a small amount of light. In a low light setting, you pupil will DILATE, or open up to allow for more light to enter your eye.

Your camera works just like this. Your camera opening is measured by a number called the F-stop; a lower F-stop number will allow for more light to enter your camera AND allow for a blurrier background. Therefore, low light allows for a better background blur.
If you are comfortable with your camera settings, set your camera to manual mode and lower your f stop. If you are not quite ready for manual mode (which is fine!), try to set your camera to aperture priority mode (A or Av, depending on your camera). In aperture priority mode, YOU determine the F stop, and your camera will evaluate the light and adjust the other settings accordingly.
So remember- a lower number creates more background blur.
3) Upgrade your Camera Gear
When I first took my camera out of the box, I was incredibly disappointed by the lack of background blur in my pictures. After-all, background blur was what attracted me to photography in the first place.
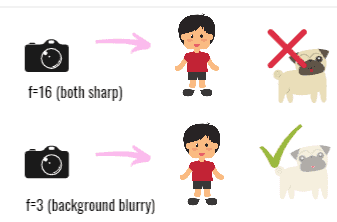
As discussed above, background blur is determined by how low the camera’s F-stop is. Typically, the lens that comes in the box with your camera cannot get an F stop as low as you desire.
I recommend purchasing a 50 mm lens. My lens will allow for an f- stop as low as 1.8 (whoa, that is low!). A 50 mm lens is a great upgrade. They take fantastic pictures in low light, and have phenomenal background blur.

The 50 mm lens is often referred to as a “normal lens” because it most closely mimics the way your eye really sees the world. A 50 mm lens is incredibly versatile, and I personally use it for 99.9% of the pictures I take.
The 50 mm lens is an affordable lens, and it is worth every penny! Check out these two lenses that I highly recommend.
Summary
Background blur both allows your to take stunning, professional-looking pictures, and tell your story the way you want others to see it.
Remember the following three tips, and print out the resource for a quick reference!
For access to this and all of our free printable and tutorials, subscribe!

If you found this helpful, share it!


Crazy-Simple Photography Beginner's Guide to Camera Settings Basics - Simply Rooted Family
Wednesday 2nd of February 2022
[…] If you have a “low” f-stop, such as 3. then your camera’s “pupil” is opened wide. This will allow a lot of light to enter in, and allow you to take great pictures in lower light, such as indoors or at night. It will also give a narrow depth of field or shallow depth of field (background blur). […]
Dreamstime
Wednesday 19th of August 2020
Great tips! Background blur can also be achieved in photography with panning: set up a slow shutter speed - around 1/50, 1/40 or even lower, and follow the subject with the camera while they're moving fast. This technique is not so simple as the ones already mentioned, but with a bit of practice, it can be done and it creates amazing results.
Michelle
Wednesday 8th of May 2019
How do I go about signing up?
admin
Thursday 9th of May 2019
Hi Michelle, there is a pop-up and also a newsletter sign-up section towards the end of each article. If you are unable to find it please let me know and I can add you! Thanks!!