Let me guess: One day you decided that you wanted to get into photography. You save up and buy a fancy new camera. If you are one of the smart ones, you understand that you will not just take perfectly professional photographs on day one. You start practicing with your camera and find that you were dead right. Your pictures suck.
But you are a strong-willed individual, and it takes more than that to force you into photography retirement this fast. So, you start researching about your camera. You read about the settings and what they mean. You head out and start practicing again- full of positive energy. When you look in your view finder your pictures start to look better, but when you download them to your computer they still suck.
At this point (for many) the frustration takes over and you pull up Craig’s list to sell your camera to some other helpless soul while you yell defeated:
I never even really liked photography anyway!
Don’t worry. This is Stage 1 of being a new photographer, and we have ALL been there! Don’t give up yet. If I (a full time working mom, with no artistic or technological bone in my body) can learn and love photography, then you can too! Let me tell you the 4 reasons that you pictures suck and what you can do to fix that.
1) You are not using your camera settings properly
You may have read a few articles about camera settings. You probably read what aperture, ISO, and shutter speed is. But do you REALLY understand them? Do you understand what they mean enough to take pictures in manual mode?
Some people chose to shoot in auto-mode. Auto-mode takes a good ‘guess’ at what your surroundings are and tries to adjust the camera accordingly. The problem is, your camera does not have a heart. It’s best ‘guess’ at what you are trying to accomplish with your photograph is, unfortunately, usually wrong. For example, you may be taking a picture of your kid indoors. Your camera sees that it is low light and in auto-mode it will slow down the shutter speed to let in more light. This picture (with a slow shutter speed) of a child shows up as a blur on your camera from movement.
Learn what your camera settings are and start to shoot in manual mode. I mean REALLY learn your settings. Know the difference between shutter speed of 1/60s vs. 1/500s. Start right here, with this easy to follow SUPER-beginner level description of your camera settings. And learn about your camera’s BUILT-IN guide (the meter), which will tell you AS you are taking your picture if it will be too dark or too light. It is a fantastic tool on most cameras! Here are my easy to read posts on these settings to get you started.
- Shutter Speed Explained for Photography Beginners: The Secret to Clear Photos
- Aperture Explained for Photography Beginners: The Secret to Background Blur
- ISO Explained for the Beginner Photographer: The Secret to Manual Mode
2) You don’t have the right camera gear
When I got my camera, I expected to instantly take pictures with those super blurry backgrounds. That just was not happening. I didn’t learn until later, that with the lens that came with my camera, that really wasn’t possible.
Someone introduced me to a 50 mm lens, and all was history. The 50 mm lens is also called a “normal” lens because it takes pictures most closely to how your eye sees the world. It gives you an option of fantastic depth of field pictures, and allows for clear photos in low light. If you want to take the next step at improving your photography, you most likely need to upgrade your lens. Check out these affordable and amazing 50 mm lenses:
Some other equipment that helped me “up my photography game” included my external flash (for great pictures when the lighting was super poor), and a tripod (for when I wanted to be in a picture or ensure I had a very still shot). You NEVER want to use the flash built into your camera. An external flash will give you extra light when needed without those awful shadows, dulling of colors, and flattening of images that comes with the built-in camera flash.
3) You put no creative “love” into your pictures
A good photograph triggers an emotional response in whoever is viewing it. Even with fanciest camera gear and full understanding of your camera, your pictures are still falling short if you don’t add your own creative ingredients to them.
When you are taking photographs, you need to awaken the creative part of your brain. There are a few things you can do easily to step up your photography game:
Move around and get in different positions- if you are taking pictures of children, get down on their level to let the viewers see what they are experiencing. I have been known to lie flat on the ground to get pictures of my kids.
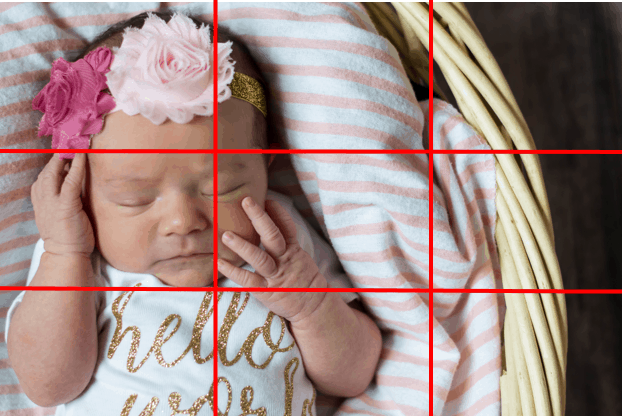
Practice the “rule of thirds”– the rule of thirds basically means that you are not centering the main image in your photograph. You want to think of the picture you are taking as divided in thirds. (See below). Contrary to what you might think, It is very pleasing to the eye to NOT center your subject in the picture.
Experiment with focal points– as the photographer, you have full control over what you want the viewer to see in the photograph. Really highlight what you want to be showcased in your picture by zoning in on different focal points.
4) You aren’t editing your photos
I am not ashamed to admit it- I edit 100% of my photos. I don’t do major editing, but I saturate the colors, make sure the exposure is exactly how I want it, and brighten eyes. Making tiny, little edits to your photographs can do miraculous things!
I use Adobe Lightroom as my editing software. It is easy to use and not overly expensive. I feel that it is mandatory if you want to get serious about your pictures. You can buy or download lightroom ‘presets’. These are pre-packaged settings that can transform the colors and feelings of your pictures with a quick click.
Here is an example of what a few small edits or a Lightroom preset can do:

No editing 
Editing
Summary
Most importantly, do not give up. If you really love photography, or you really want to learn it, it is absolutely possible. By truly learning your camera settings, making sure you have the right equipment, and getting a little more creative you GOT this!
Remember- your first 10,000 pictures will be your worst!
Check out some of my other recent posts
- The Best Headshot Photography Guide for New and Professional Photographers
- How to Take Pictures During the Golden Hour
- Top 5 Most Common Beginner Photography Questions Answered
- 10 Photography Posing Prompts for Natural Family Photo Sessions
- The Ultimate Guide to Everyone’s Favorite Holiday Photographs
If you found this helpful, share it!


Sandy Phelos
Wednesday 14th of November 2018
Thank you for your awesome blog!! I am learning so much about the rewarding world of photography and feel very confident when taking pictures now!!!
Andrea
Tuesday 13th of November 2018
Wow!! Thank you for writing this!! I definitely learned a lot from reading this. I will implement these the next time I take pictures.